"Spring's Rebirth"

"Spring's Rebirth"
"Spring's Rebirth" 18"x30" Acrylic on Canvas 2016

Friday, November 22, 2013

One Point Perspective: Featured Artists


 Erik S.
 
 
 Madison H.
 
 
 Carli K.
 
 
 Hallie M.
 
 
 Natalie H.
 
 
 Ian L.
 
 
 Mason J.
 
 
 Mackenzie F.
 
 
 Tatum K.
 
 
 Piper M.
 
 
 Chardae H.
 
 
 Tim D.
 
 
 Alissa P.
 
 
 Brad R.
 
 
 Lee R.
 
 
 Amber W.
 
 
 Emily H.
 
 
 Jack A.
 
 
 Tara S.
 
 
 Hannah H.
 
 
Jenna B.


Tuesday, November 12, 2013

Abstract Color Wheel 2013!

To begin, students study the color wheel.  They review the primary and secondary colors.  Students learn about "tertiary" or otherwise called "intermediate" colors, which are the mix of a primary and a secondary next to each other on the color wheel.  Here is an example of this: Yellow is next to Orange, mixed together, you get yellow-orange.  When labeling the tertiary colors, the primary color name always goes first!

Next came the design.  Students were allowed to design and balance any twelve shapes they wanted.  There are twelve colors on the color wheel, so they needed twelve shapes for theirs.  The design could have been realistic, abstract, or non-representational.  Then students begin painting.  Students learn a lot about brush care, how to keep the painting area clean, and brushstroke techniques to improve neatness.  In the first session, they paint yellow, yellow-orange, orange, and red-orange.


In the second session, students finish painting the remaining eight colors.  They could choose to have the colors go in order of the color wheel, or to be placed anywhere they want.  This session included painting red, red-violet, violet, blue-violet, blue, blue-green, green, and yellow-green.


During the last two sessions, students learn about value in order to decorate the background.  Value is how light or dark something is.  They practice two drawing techniques that create value called hatching and cross-hatching as a warm up.  Then, the background is divided up into shapes.  Finally, a balance game challenges students to create a variety of different values in their background.  The rules are simple, do not let any two shapes that touch each other have the same value.  Starting off each shape is filled with a light value.  Then starting from one side or the other, the balance game begins.  Adapting as they go, students move across their background making informed decisions about what shape needs what value.

 The beginning of the balance game
 
 Part way through the balance game
 
Finished!

Wednesday, September 25, 2013

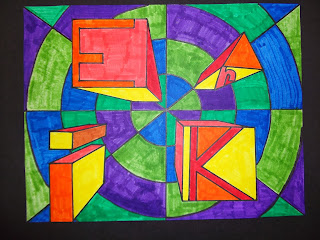
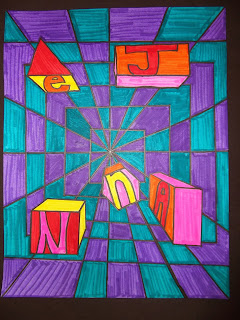
One-Point Perspective - Optical Illusion

One Point Perspective - Optical Illusion
 
Week 1:
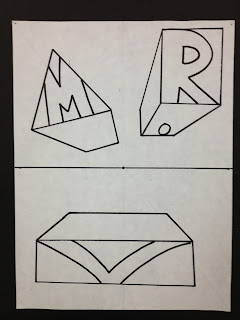
One point perspective creates the illusion of 3D form on a flat 2D surface, which plays with our perception of space and depth. There are many steps to this project.  First students draw a horizon line in the middle of the page, then add a vanishing point in the center of that time.  Next, students add their shapes which takes four steps:
  1. Draw the shape you want.
  2. Connect open corners from the shape to the vanishing point.
  3. Draw parallel lines in each side to close the shape.
  4. Erase the extra guidelines between the shape and the vanishing point.

During this process students learn the importance of using a ruler to keep all lines straight and clean. We also talk about different types of balance in art.  All artwork has some kind of balance.  In this project, we want to create even balance.  Students ware challenged to make enough shapes to fill in the letters of their name and to balance those shapes to achieve even balance.  Students also learn how to make their block or bubble letters "fit" into the shapes.

Week 2-3:
Next, we address the background.  We want a pattern in the background to visually separate the 3D shapes from the background, and to make the background interesting to look at.  Students begin with some lines to break up the background into an even number of spaces, all intersecting the vanishing point.  Then students select whichever shapes they wanted to draw to overlap the background lines.  This set up an interesting background that could be colored as a pattern.  Once this is done, students trace all these lines with sharpie.  We also talk about careers that use one point perspective, such as architects and graphic designers.

Week 4-5:
Finally, students learn about color theory.  Warm colors are perceived to come out towards us as viewers and cool colors are perceived to recede away from us as viewers.  Obviously, to enhance the optical illusion, students learn to use warm colors in the 3D shapes/letters and cool colors in the patterned background.  Using color in this way really helps to visually separate the 3D shapes from the background.

Monday, August 26, 2013

Welcome to the 2013-2014 School Year!


Dear Students and Parents,

This year in 6th grade, every student takes art class.  I am very excited and honored to have the opportunity to lead students though the 6th grade art curriculum.  I have a few things I would like to share with you about what our year in art will look like.


1.      Goals: (A few of my goals for the year).

a.      Create a fun and positive learning environment for each student.

b.      Challenge each student to think, problem-solve, be creative, and grow.

c.       Share my love and passion for art (hopefully it becomes contagious).

d.      Enhance each student’s artistic vocabulary/understanding of the art elements and principles.

e.      Clearly communicate weekly through family access and share pictures on the 6th grade art blog.

2.      Expectations: (A few things I appreciate from students in the art room).

a.      Come to art class prepared with a pencil each session.

b.      Come with a positive attitude and willingness to work.

c.       Come ready to give your best and use art time to its fullest!  Stay on task!

3.      Pacing:

a.      Each class comes to art once a week, which is 35 times this year.  Once you factor in snow days, days off, assemblies, band/choir concerts etc… we will have less than that original 35.

b.      Please be patient (everyone).  Many of our projects take four or more sessions to complete, so as we only meet once a week, that translates to a month or longer for most of our projects.

c.       There may be long stretches of time where student artwork will be at school.  All artwork will be sent home by the end of the year.

d.      Overall, we move slowly but produce high quality work!

4.      Classroom Behavior: (With time at such a premium, I have high expectations for student behavior).

a.      Positive attitude, positive participation, and positive comments.

b.      Use work time in a productive manner, try your best, and do not give up!

c.       Respect each other and the classroom/materials.

5.      Grades: (I use the traditional 4.0 letter grade system).

a.      I grade based on two things: The artwork and participation/effort.

b.      Each time a student is in class, they earn or lose up to five points.  At the end of the marking period, points are tallied and count as a participation/effort grade (equivalent to a project).

c.       I grade the artwork based on several factors:

                                                              i.      The main learning objectives of the project.

                                                            ii.      Craftsmanship, this is how neat and orderly the artwork is.

                                                          iii.      Use of class time, I analyze if students are “on task” and how well they use work time.

                                                           iv.      Effort/attitude (listening, following directions, helping during clean up, etc…)

6.      Homework: (There is usually no homework).

a.      There may be a writing assignment or two sent home as homework, an information sheet will accompany any such assignments.

7.      Make-up Work: (If you are a slow artist or miss an art session, there are many ways to catch up).

a.      All assignments in each marking period must be completed before grades are due, that is usually one week before the end of the marking period.

                                                              i.      Connect time.  Just get a pass from Mr. VandenBerg and come work.

1.      East = Tuesdays

2.      North = Thursdays

                                                            ii.      Before or after school.  I make myself available before or after school on Monday thru Thursday.  Parents, please officially schedule ahead of time through e-mail or phone to ensure I do not have a scheduling conflict of some kind.

1.      East = Mondays and Tuesdays

2.      North = Wednesdays and Thursdays

                                                          iii.      Lunch time.  Students please schedule ahead of time so I know you are coming.

1.      East = Mondays and Tuesdays

2.      North = Wednesdays and Thursdays


8.      Discipline:

a.      The art room should be a safe, quiet environment where students feel free to focus, be creative, and explore/experiment with the learning objectives.

b.      We will build a social contract early in the year which we will need to abide by. 

c.       I want the best for each student, I want each student to have fun and enjoy art time, but there are circumstances that require a discipline framework.

d.      I like to use the old baseball “Three Strikes & You’re Out”

                                                              i.      Strike 1 = “four questions” and a verbal reminder.

                                                            ii.      Strike 2 = “four questions”, verbal warning, and possible demerit or lunch detention.

                                                          iii.      Strike 3 = Behavior discussion, “four questions”, lunch or after school detention, parent phone call, possible trip to the office.

e.      Three demerits in a semester will equal a detention.

f.        Three times being tardy to class in a semester will equal a detention.


9.      Project Outlook: (A quick look at our units).

·                    One point perspective drawing

·                    Color: abstract color wheel and color scheme painting

·                    Pottery: Native American Indian pinch pots

·                    Printmaking: Designing a cover for an autobiography

·                    Cubism: Art history and an abstract self-portrait

·                    Realistic observational drawing


Thank you for taking the time to get to know the 6th grade art program a little better.  I look forward to having a great year with the 6th grade students. 


Sincerely,


Mr. VandenBerg

6th Grade Art Teacher

Monday, June 3, 2013

East Rockford Middle School Art Show 2013

The East gym was filled with 300 art pieces from our 6th grade students!!!


 The 6th grade band performed some wonderful music!


Tuesday, May 14, 2013

Cubist Self-Portrait

To begin, we "abstracted" ourselves in the style of Cubism.  To abstract, is simply to change reality.  We changed ourselves according to the rules of Cubism: use straight lines and geometric shapes.

Next we added a background.  Any background was acceptable, anything from an outdoor scene to just patterns or design (wherever you wanted yourself to be).

Then we added collage, a very traditional Cubist technique.  We used newspaper, colored construction paper, and fabric.

We used collage in interesting ways by overlapping it and drawing back on top of it.  A color scheme was also an option, but not required (warm and cool used above).

Lastly, to make it more abstract and interesting, we completed it with many media, turning it into a mixed media piece.  We added pencil, colored pencil, oil pastel, and marker.

Tuesday, April 23, 2013

Featured Artists: Autobiography Cover (Printmaking)

Catherine V.


 Jillian R.


Colleen H.


Luke S.


Lauryn R.


Britney N.


Sophie M.


Taylor K.


Nicole T.


Jack F.


Cole H.


Bryce P.


Madison S.


Julia V.


Alyssa H.


Maddie C.


Anthony D.


Jacob U.


Katelyn K.


Ethan M.